The Organizing Objective
If you watched my April 11, 2019 VLOG for Goodwill Industries of Alberta (click here to view!) you were introduced to three snippets of sage...


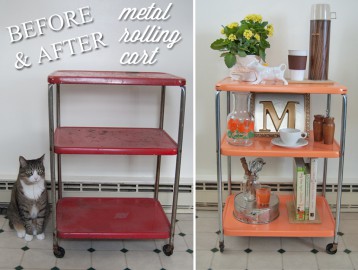
This rusty cart has been a part of our home since we thrifted it three years ago, and it’s always been one of my favorites. I love the utility of having accessible, easily transportable storage, and my favorite things are the ones that, like this, come with stories (i.e., paint splotches, rust spots and water rings from glasses long-since emptied). My husband and I are currently looking to buy our first home, so I am busy as a bee thrifting and fixing up the perfect pieces to fill it.
I was pleasantly surprised with how simple this remake was! For supplies I needed paint, brushes, painter’s tape, steel wool, a dust mask and coarse sandpaper. I had originally wanted to spray paint the cart, but when I went down to my local hardware store, the color options for regular paint were just so much better! A kind employee helped me mix this color specifically, and I am absolutely in love. I didn’t catch her name, but owe her a big “thank you” for bringing this perfect Tangerine Fusion into my life. (And there’s plenty more for future projects!)
The only advice I have if you want to try this is to do it in the summer! It’s still below freezing here, so the sanding was chilly and the painting had to happen indoors. That wouldn’t have been possible with spray paint, so I’m happy I went with regular. If it’s already warm where you are, then grab those supplies and head to Goodwill (where the dollars you spend will provide individuals with opportunities to turn jobs into careers) to look for a metal cart of your own.
Now, let’s get started!
Take your cart, steel wool, sandpaper and elbow grease outside! I started by shining up the legs, which had acquired some pretty intense rust dots. To my surprise, getting rid of these is as simple as rubbing them with steel wool! You can see the pre-steel wool rust spots below the screw and the parts I’ve already fixed above it—pretty nice, huh?
Cover your face with a dust mask and start scrubbing all of the painted parts with sandpaper. You don’t need to take off all of the paint; you just need to create an even surface with plenty of traction for the paint to stick to. I dedicated a couple of hours to this task.
Use a rag or damp paper towel to clean off all of the dust from sanding. Make sure the metal is completely dry, and put painter’s tape over the legs where they connect with the trays to protect them (you could also take the cart apart). Keep in mind that if the old paint is dark and the new paint is light, you’ll need primer or several coats of paint. When you’re ready, start painting!
Allow your paint to dry according to the directions, apply a second coat if necessary (I did), dry again, remove tape and put to use! I’m so happy with this spring transformation and encourage you to give it a shot, too.
Happy cart hunting!
xx, Julia
